Showing posts with label Hobby Ideas. Show all posts

INTERESTING & COLORFUL DECORATION IDEAS FOR A BRIGHT DIWALI~ www.hobbyideas.in


India 28 October 2016: Diwali is round the corner and this bright festival signifies the victory of light over darkness. It is time to decorate our home with different ideas and mark the festival by preparing for these special moments. 

INTERESTING & COLORFUL DECORATION IDEAS FOR A BRIGHT DIWALI~ www.hobbyideas.in


It is now time to stop searching and be creative and do something different in our own way of decorating things. Hobby Ideas, India’s leading art & craft brand, is glad to bring to you a variety of Diwali decoration ideas and recipes. These recipes are eco friendly, easy to be made and can be made by all kinds of homemakers. Also, the materials required are readily available at home. 

Here are the top 4 recipes that all families would like to make and have a happy and beautiful Ganesh Chathurthi : 1) Acrylic Rangoli Making Ideas  2) Diya decoration in 5 steps  3) Easy Rangoli Pattern for Diwali  4) Diwali Lantern 

Acrylic Rangoli Making Ideas 

 Acrylic Rangoli Making Ideas

Acrylic Rangoli Making Ideas

Acrylic Rangoli Making Ideas

DESCRIPTION: Make beautiful and attractive rangoli decorations taking inspiration from this article that we have made for you. Diwali spells happiness, joyousness and prosperity and rangoli making most often have that element of austerity and spirit that bring in glad tidings. 


MATERIAL : Water Container, Colour Palette, Ornamental Stones (Orange Round Shaped), Mirrors (Medium Sized Round, Diamond and Triangle Shaped), MDF Wooden Placemat (12", 8", 4" Square Shaped and a Round Coaster of 2" in Diameter), Jute Yarn, Scissors 

METHOD: Step 1 
 • Take a square wooden MDF placemat measuring 12"x 12" and 8" x 8" and a 2" round coaster. 
 • Paint the placemat and the coaster with Sparkling Pearl - Dark Blue and Golden Green.  • Leave it to dry.  

Step 2 • Take the blue painted placemat and stick it on the green placemat with Fabric Glue.  


Step 3 • Take a piece of canvas measuring 10" x 10" in size. • Draw 4 semi circles on it, of the same size, approximately 1".  • Cut along the outlines of the circles.  

Step 4 • Stick the semi circles around the blue square with fabric glue.  • Paint semi circles with pearl metallic gold colour.  • Leave it to dry. 

 Step 5 
 • Embed medium sized mirrors on the periphery of the circle using Liquid Embroidery - Pearl Blue.  • Leave it to dry. 

 Step 6 • Now take square MDF wooden placemat measuring 4"x 4" in size.  • Cover the placemat by sticking a jute yarn on it using Fabric Glue. 

 Step 7 
 • Paint the jute placemat using Pearl Metallic – Gold. • Leave it to dry.  

Step 8 
 • Stick the painted jute placemat in the centre of the painted blue placemat thereby giving you layers.  • Refer to the image.  

Step 9 
 • Take the Shilpkar - resin base and hardener, mix it thoroughly to make an even dough.  • Take the ball of dough, roll it further to make thin coils. 
 • Stick the coils on the blue painted placemat from the outer edge of the square towards the centre to create three squares in a descending order.  • Refer to the image 

Step 10 
 • Take the dough and create a design around the centre square by embeding few diamond, round and triangle shaped mirrors on it.  • Leave it to dry. 

Step 11 
 • Now take your painted round coaster which we have kept aside. • Stick the coaster on the jute based square using Fabric Glue.  Step 12 
 • Enhance the rangoli design by sticking few orange ornamental stones around the periphery of the coaster and also around the semi circles using Fabric Glue.  • Let it dry. Step 13 
 • Take diyas of your choice, paint and place them on your rangoli. • Your creative rangoli decoration for diwali is ready. 

- Rangoli designs For Diwali are meant to bring in good vibes and prosperity into homes so here we have a colourful and unique acrylic rangoli design that you can make with different colour combinations and shapes 

 Diya decoration in 5 steps 

 Diya decoration in 5 steps

DESCRIPTION: Learn to make this lovely handmade decorative diya on the occasion of 
 Diwali this festive season. A very pretty and vibrant diwali diya decoration idea that you can further enhance to suit your Diwali theme or your colour schemes of your home decor. 


 Diya decoration in 5 steps

MATERIAL: Water Container, Colour Palette, Mirrors (Diamond and Round Shaped), 
 Ornamental Stones (Small Sized Round Shaped) Plain Terracotta Pot, Sponge. 

METHOD: Step 1 
 • Take a plain terracotta diya.  

Step 2 • Paint the diya by giving a first coat with white.  • The white colour will work as a primer.  • Leave it to dry. 

Step 3 
 • Paint the diya in a shading manner using Sparkling Pearl Colours - Dark Blue, Turquoise Blue, Emerald Green and Golden Green.  • Leave it to dry thoroughly. 

Step 4 
 • Stick the diamond and round shaped mirrors with Fabric Glue around the neck and bottom part of the diya.

 Step 5 
 • Paint the diya by giving a kundan effect using Yellow, Orange and White colours. • Leave it to dry. • Your beautifully handmade diya decoration is ready for the festival of Diwali. 
 • During the festival of Diwali we all think lights and diya decorations make your own personalized and thematic decorations to suit the occasion. 
 • While making this project you could inculcate and be more creative by thinking of more diya decoration ideas to enhance your creation. 

Diwali Lantern 

Diwali Lantern

Diwali Lantern

DESCRIPTION : Learn how to make kandils/lanterns this festive season. Diwali, the festival of lights illuminate your homes and on this special occasion, celebrate by making Diwali kandils that suit your home decor or follow a theme for the season. A handmade kandil like this is a good gift to give away to friends and relatives, to add that personal touch and at the same time customize them accordingly. 

MATERIAL : Water Container, Colour Palette, Pencil, Ruler, Paper Cutter, A4 Sized OHP Sheet, A4 Sized White Paper, Yellow Carbon Paper, Mount Board, Multi- Coloured Thread, Golden Coloured Ribbon, Scissors, Golden Coloured Tassels And Beads, Half Cut Pearls. 

METHOD: Step 1 
 • Take an A4 sized white paper and draw a floral design on it.  • Take the canvas sheets and cut out 4 panels that measure 10” x 12” in size. • Draw a rectangle within leaving a 1" inch border from all the four sides. 
 • You will get the inner window which measures 8” x 10” in size. Follow the same on the remaining three panels. 

• Take a floral design and place it in the middle of the rectangle and trace it using carbon paper.  • The ready traced floral design on the panel will look like this. Similarly, do the same  on the remaining three panels. 

 Step 2 • Cut out the floral pattern with a paper cutter as shown. • Similarly, do the same on the remaining three panels. 

 Step 3 
 • Sponge dab the entire panel with Pearl Metallic – Gold. • Leave it to dry. Repeat the same on the remaining three panels. • Your ready painted panels will look like this.  Step 4 

 Take 4 A4 sized OHP sheets. Paint each of the panels with Water Based - Glass Colours – Tomato Red, Ultramarine Blue, Crystal Green and Orange.  • Leave them to dry.  

Step 5 
 • Take a mount board, cut out a frame (window) which is of the same size as that of the canvas which has the cutwork design.  • The mount board would give sturdiness to the panels • Start assembling the lantern. Begin by placing the canvas panel on a flat surface. 
 Spread Fabric Glue and stick the painted OHP panel on it. Then stick the frame shaped mount board on it with Fabric Glue.  

Step 6 
 • Using a broad masking tape, join and stick the panels at angles and complete the lantern.  • Your diwali kandil has finally taken shape and form • Let it dry.  

Step 7 • 

For a more finished look stick the golden lace on the four vertical corners with Fabric  Glue. 

Step 8 
 • Stick the half cut pearls in the centre of each flower with Fabric Glue. 
 • To hang your lantern use the multi-coloured threads from the four top corners with few beads inserted and secure the ends with a bead.  • Stick tassels towards the ends the lantern for a more decorative and festive look. 

- Using glass colours here for kandil making as shown above, are just one of the many ways to make them. 
 - You could get more innovative and creative by getting some more diwali lantern making ideas. 
Read More »

Fevicol Hobby Ideas : GARBA DECORATION Other Craft Ideas By Hobby Ideas

India 6 October 2016: 

 YOU WILL NEED 

Fevicryl Acrylic Colour - White 27, Fevicryl Acrylic Colour Pearl Metallic - Gold 352, Hobby Ideas 15mm Pink Family Quilling Strips, Fine Art Brushes, Fevicol MR,Quilling Tool, Readymade Terracotta Garba Pot, Water Container, Colour Palette, Light Pink Coloured Thread Pink Coloured Beads, Scissors.

Fevicol Hobby Ideas : GARBA DECORATION


Try this great garba decoration idea using paper quilling for this Navratri! You can customize your garba decorations as per your paper quilling skills and the theme you are following for the season.
   
 HOW TO DO IT YOURSELF 

STEP 1   

Fevicol Hobby Ideas : GARBA DECORATION


Take a terracotta garba pot. Paint the pot by giving the first coat with White 27. Leave it to dry. After drying, paint the pot with Pearl Metallic Gold. Leave it to dry.

STEP 2  

Fevicol Hobby Ideas : GARBA DECORATION


We are making an interesting garba pot with a detachable floral jacket using the quilling techinique. We will need different shades of pink coloured quilling strips and a quilling tool to make different shapes. Quill the strips to make loose coils. Make big and small teardrop shapes and few leaves and keep them aside. First take the leaf shapes, join the leaf shape to make a continues chain. Make the leaf shaped chain in the size of the periphery of the bottom edge of the garba and the upper edge / neck. You will need 2 leaf chains in two different sizes mentioned in above point. Refer to the main image.  

STEP 3  

Fevicol Hobby Ideas : GARBA DECORATION


Similarly, take small sized teardrop shapes Arrange and stick the teardrop shapes together to make a flower using Fevicol MR. Leave it to dry.

STEP 4  

Fevicol Hobby Ideas : GARBA DECORATION


Make about 10 to 12 such flowers of different colours. Refer to the image.
       
STEP 5  

Fevicol Hobby Ideas : GARBA DECORATION


Stick all the flowers above on the leaf shape chain using Fevicol MR. Leave it to dry. Make about 2 such quilled flowers with a chain of leaves.

STEP 6 

Fevicol Hobby Ideas : GARBA DECORATION


Repeat the process by building these quilling shapes to cover the garba pot as seen in the image. Your jacket for the garba pot will look like this after joining all the shapes.
     
STEP 7  

Fevicol Hobby Ideas : GARBA DECORATION


Now create the cover for the lid. Take few quilled shapes of leaves and teardrop shapes. Create the leaf chain around the lid of the pot to create a cover for the lid using Fevicol MR. Refer to the image.

STEP 8  

Fevicol Hobby Ideas : GARBA DECORATION


Secure the jacket by tying a light pink coloured thread from the rear side of the quilled design. Secure the ends of the thread with few pink coloured beads.  Refer to the main image.

Now that you have a Garba pot decoration idea, try out different quilled shapes to decorate the Garba for a fun filled, colourful and creative Navratri!


Read More »

Fevicol Hobby Ideas : DANDIYA DECORATION By Hobby Ideas

India 6 October 2016: 

YOU WILL NEED THE FOLLOWING FOR DANDIYA DECORATION

Fevicryl Acrylic Colours - Crimson 04, Light Green 12, Orange 17, White 27, Fevicryl 3D Cone Outliner Non Sticky - Yellow 703, Orange 705, Fevicryl Fabric Glue, Fine Art Brushes.Colour Palette, Water Container, Toothpick, Small Sized Foil Mirrors, Golden Ribbon, Scissors, Two Pairs of Readymade Wooden Dandiyas, Readymade Tassels with Beads And Shells.


Fevicol Hobby Ideas : DANDIYA DECORATION


Gleam this Navratri with these brilliant Dandiya Decoration Ideas. This handmade dandiya stick decoration is a unique idea to celebrate and participate on the occasion of navratri.      

HOW TO DO DANDIYA DECORATION YOURSELF 

STEP 1   


Fevicol Hobby Ideas : DANDIYA DECORATION


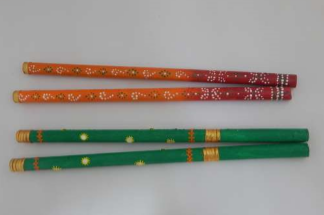
Take 2 pairs of plain wooden dandiyas.
   
STEP 2  

Fevicol Hobby Ideas : DANDIYA DECORATION


Paint one pair in a shading effect using Crimson and Orange and the other pair with Light Green.

STEP 3    

Fevicol Hobby Ideas : DANDIYA DECORATION

  
Take the orange and red pair of dandiyas. Using a toothpick make dots with white and light green colours thereby giving a bandhani effect. Enhance the dandiya by tying a golden ribbon on the top side edge using Fabric Glue. Leave it to dry.

STEP 4 

Fevicol Hobby Ideas : DANDIYA DECORATION


Take the green pair of dandiyas. Divide the dandiya by sticking a golden ribbon using Fabric Glue. Divide the dandiya in such a way that one part is small and the other is big. Stick the foil mirrors randomly on the larger side with Fabric Glue.    

 STEP 5  

Fevicol Hobby Ideas : DANDIYA DECORATION


Replicate the kutchi bharat embroidery around the foil mirror with 3D – Yellow. Leave it to dry. Also replicate the border design from the kutchi bharat embroidery using 3D – Orange. Refer to the image.

STEP 6  

Fevicol Hobby Ideas : DANDIYA DECORATION


Here you have your two beautifully hand decorated and customised pairs of dandiyas ready for the Navratri festival.      

STEP 7  

Fevicol Hobby Ideas : DANDIYA DECORATION


To further enhance the dandiyas, tie the beads and shells tassels towards the ends of the dandiyas and secure the ends with Fabric Glue. Leave it to dry.
Now that you have learnt how to decorate dandiya sticks, flaunt them during this Navratri. This handmade dandiya stick decoration idea is also an interesting idea to try out as they can help you customize your dandiyas as per your outfits. Make them differently by choosing the colour combinations of your choice and preference.


Read More »

Fevicol Hobby Ideas : EASY HANDMADE CHATRA FOR NAVARATHRI GOLU - Glass Painting By Hobby Ideas


India 6 October 2016:

YOU WILL NEED 

Fevicryl 3D Outliner Non Sticky Glitter - Gold Rush 408, Fevicryl - Water Based - Glass Colours - Sea Blue 853, Pink 856, Orange 860, Fevicryl Fabric Glue.Golden Ribbon, Lace Of Beads, Thread, A4 Sized White Paper, A4 Sized OHP Sheet, Scissors, Pencil, Ruler


Fevicol Hobby Ideas : EASY HANDMADE CHATRA


This Navarathri, make a chatra (umbrella) for the idols adorning your Golu! This handmade chatra gives a very traditional temple-like look to your Golu.      
 
 HOW TO DO IT YOURSELF 

STEP 1  

Fevicol Hobby Ideas : EASY HANDMADE CHATRA


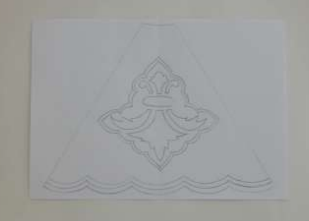
We are going to make a chatra for the main idol in our Golu Decoration. Take an A4 sized white paper. Draw a triangle with base 10'' and two sidesof 8''. cut out 1'' section from top for good balance. Trace an ornamental design on it as seen in the image.

STEP 2  

Fevicol Hobby Ideas : EASY HANDMADE CHATRA


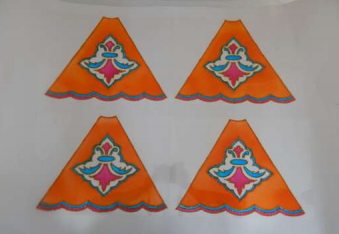
Place an OHP sheet on the drawing and outline the design with Glitter - Gold Rush. Leave it to dry. Make 4 such designs sheets. Refer to the image.      

STEP 3  

Fevicol Hobby Ideas : EASY HANDMADE CHATRA


Paint your four designs with Glass Colours - Sea Blue, Pink and Orange. Leave it to dry.

STEP 4  

Fevicol Hobby Ideas : EASY HANDMADE CHATRA


Take 4 painted OHP panels. Join two side edges of the panels with the golden ribbon using Fabric Glue.  When you join all the panels you will get a pyramid shape.          

STEP 5  

Fevicol Hobby Ideas : EASY HANDMADE CHATRA


Enhance the pyramid shaped chatra by sticking the lace of beads towards the bottom side using Fabric glue. Punch holes on the top side of each panel using the beads and thread to dangle it above the head of the idol. Alternately, light a bulb inside the chatra that will create an aura around the idol.

Read More »